

Well it looks a bit "cacat" to me, but I kinda love it :)
I love how it falls on my hair.... cuteeeeeeeeeeeeeeeee :3
Okay, here goes the tutorial.
have fun peeps~!
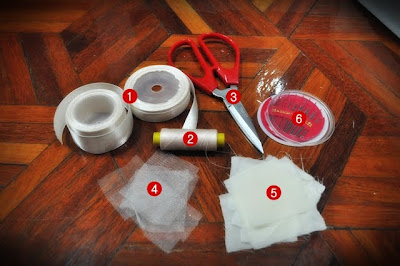
1 : Ribbon, any sizes. Here I'm using 1.5cm.
2 : Thread
3 : Scissors
4: Net (cut the fabric into squares) I cut them into 2inches x 2inches, you can cut them gradually, doesn't really need to be that accurate
5: light fabric ( using light weight cotton here) Don't use chiffon, I tried but it doesn't turn out nice.
6 : Needles
2 : Thread
3 : Scissors
4: Net (cut the fabric into squares) I cut them into 2inches x 2inches, you can cut them gradually, doesn't really need to be that accurate
5: light fabric ( using light weight cotton here) Don't use chiffon, I tried but it doesn't turn out nice.
6 : Needles

*Ignore my nails please*
1 : take one piece on the cotton fabric and pinch into a petal or form a bud.2 : Then, take the net and do the same thing, wrap the first bud. (I put both fabric and pinch together...*lazy*)
3 : Measure your desire length of ribbons, and sew the fabric bud against the ribbon. ( I did not start in the middle of the ribbon because you won't be wearing it on top of your head, so sew it slightly left or right.)
4 : continue sewing the rest of the buds accordingly but remember to leave some space in between each buds. If you prefer to have a loose ruffly effect, offset the distance more. If you are using a bigger size ribbon, you might need to sew 2 or 3 buds in a row.
5 : All the buds are to be sewn in ONE DIRECTION. Keep adding buds until you think that it's enough.
6 : You can trim the fabric as you can see from the pictures above that the edges are kinda messy. but I leave it that way because it looks fine to me, and I like the way the thread came off from the fabric.
Okay, that's all for the tutorial, I hope this is helpful. Have fun and do drop me a message if you have any question.. ttfn~
xoxo,
Reanne


No comments:
Post a Comment